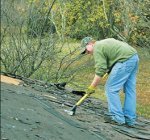
 Installing a new roof is a very big project and, while not overly complicated, can be extremely strenuous. One of the biggest, and also most labor intensive parts, of a new roof installation is removing the old shingles. Even if you do not plan on doing the actual roof installation yourself, doing the demo can save you a big chunk of money and is not difficult at all, as long as you do not mind getting your hands dirty.
Table of Contents
Tools Required
 Tear Off Tools: There are not many tools required to do the roof demo, with a sturdy tear-off tool, usually being the most important. A tear-off tool is a specially designed tool used to remove shingles. It has a triangle shaped head and long handle, allowing you to easily pry off shingles. Since it has teeth, it is easy to use it to remove nails and other debris.
While a shovel could also be used, and was commonly used in the past, it is better to go ahead and invest in a few tear off tools, one for each worker on the roof.
Dumpster: It is a good idea to rent a dumpster to put the old shingles in, as well as other materials you may need to discard. Most states have very strict rules when it comes to shingle disposal, as they are petroleum products. They can not be burned and usually can not be disposed of in city-convince style dumps. Instead, you usually need to take them to a landfill and using a trailer to haul them away can be time consuming and expensive.
Instead, renting a dumpster is usually the way to go, as most offer a standard fee for so many tons of debris and will pickup/drop off the dumpster. Dumpster placement is important, as you want it to be in a place where you can easily drop shingles into it from the roof. Of course, keep in mind that when fully loaded, a full size truck will need to be able to get in and out of your yard with it, so it should not be placed on or around soft ground.
Tarps: While not technically required, it is a good idea to place a tarp under the roof as you tear off shingles. Inevitably a lot of debris will fall off the roof and a lot of nails. By having a tarp down, you can keep many of these nails from falling in your yard.
You can use a smaller tarp and periodically move it, as you move along the roof. Also, if it rains during the tear off, a tarp can come in handy.
Ladder: You will also need a ladder to get onto and off of the roof, as well as carrying supplies up and down. While you could technically use an a-frame ladder, this is not recommended, as it is not as safe as a straight ladder, especially when carrying items or at the end of a long day.
There are of course a number of other tools you might end up using and chief among them is a good set of gloves. However, the above tools are the most common.
Removing the Old Roof
 Once you have the tools assembled, you can begin tearing off the shingles. Using the tear-off tool, you can pry under the shingles, removing both nails and shingles. Depending on the condition of the old shingles, it is usually possible to take them off in somewhat large sections.
It is a good idea to to make an effort to place shingles directly in the dumpster, rather than just letting them fall off the roof. You will have a decent amount of cleaning up to do on the ground anyway, so each shingle you put directly in the dumpster is one less you have to pickup off the ground.
Initially, it is a good idea to simply get down to it, tearing off as much as possible in as big of pieces as possible. However, you will need to remove all nails, felt, and staples from the roof before you can start laying new shingles. Otherwise, you risk damaging the new shingles and creating water leaks. So, you will want to go over it several times to ensure that you did not miss any nails or other objects.
Some roofing contractors like to do the roof in sections, so will tear-off and install at the same time. If this is the case, it is important to plan out the demo, so you never end up carrying debris or walking along the new shingles.
After all the old shingles have been removed, including any nails, staples, felt paper, or other obstructions, you are ready to start installing your new roof.
